
Audio insider: A simple guide to producing the best audio mixes
By Howard Jones, communications director, Genelec
Any broadcast audio engineer will be accustomed to working quickly in pressurised studio environments that may not always have the finest acoustic properties. From a cramped OB truck to the ad-hoc remote working spaces that COVID-19 has made commonplace, audio engineers in broadcast have to deliver consistent, reliable mixes that translate across a wide range of delivery formats, even if their acoustic space is somewhat compromised.
To do this, the engineer needs to rely heavily on their studio monitoring system, since this will inform and guide every single mix decision. But what you hear from a studio monitor is a combination of the performance of the monitor itself, its interaction with the room, and your listening abilities. So a good monitoring system is wholly dependent on choosing the appropriate monitors for the room, placing them correctly and then ensuring that they are optimised for the acoustic environment they are working in.
While the best starting point is always a well designed and acoustically treated room, here we’ll walk you through some simple steps that will help you get the most from your monitoring system, and help produce mixes you can rely on!
Monitor choice
Rather than focussing on a monitor’s driver sizes and power ratings, the most important criteria for choosing the correct monitors are your typical listening distance, the width of the frequency response required (including how far down the LF response needs to extend) and the sound pressure level (SPL) that you need to monitor at.
Concerning listening distance, if you sit too close to a monitor then the summing of the sound from the various drivers in the monitor will usually be affected, and the flatness and stability of the frequency response will deteriorate.
Conversely, if the listening distance is too long then the reverberant sound of the room starts to overwhelm the direct sound from the monitor, and this will introduce unwanted coloration and degrade the audio imaging.
With SPL levels, you may be working to an international standard listening level or simply have a preferred playback level based on your own preference and experience. Either way, once you know this level, simple tables like the ones shown here (fig 1) will serve as a good starting point for narrowing down your choice of monitors.
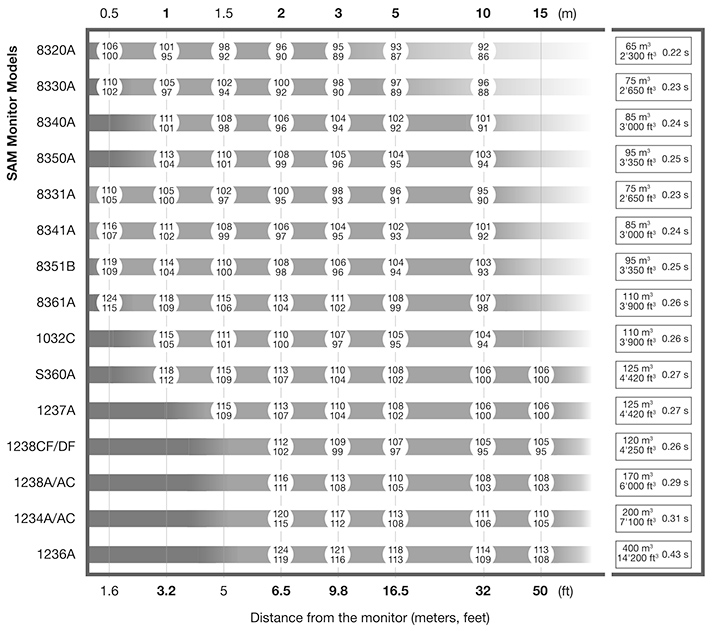
Fig 1
Monitor placement
How your room is set up and where you position your monitors will affect their performance significantly. Taking a simple stereo set up as an example, here are some goals to aim for:
- To improve imaging, ensure that your listening set up is symmetrical and centred in the left to right axis of your room (fig 2).
- Position your monitors at ear level so that the monitors and the listening position are at the corners of an equilateral triangle, and aim them at your listening position without any obstructions such as computer screens. Monitors can be raised and tilted down towards the listening position, but try to keep the angle of tilt at 15 degrees or less. Try to avoid placing the monitors mid-way between floor and ceiling, since both those surfaces can cause reflections.
- Since the wall behind your monitors will also cause reflections, which can cause a significant cancellation ‘dip’ in frequency response, flush mounting of monitors within the wall is the optimal (though not always practical!) solution. An alternative is to position your monitors between 5cm and 60cm from the wall, to avoid that dip occurring in the critical LF region. Some further EQ adjustment may then be necessary (see next section on calibration).
- A subwoofer is of real benefit for helping to achieve a neutral, controlled LF response, since it can help mitigate any LF issues created by rear wall cancellation and allow the main monitors to focus their energies on the rest of the frequency spectrum. When positioning a single subwoofer, place it along the front wall, slightly off-centre from the room’s middle axis.
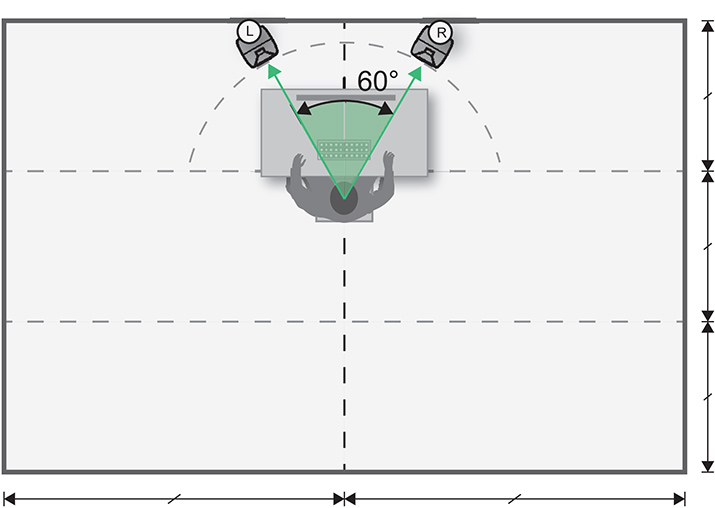
Fig 2
Monitor calibration
Once your monitors are correctly positioned, you’ll need to find out how the room is affecting their frequency response, in order to minimise any negative acoustic effects and achieve a more flat, neutral in-room response.
The most accurate way of doing this is via a reference microphone and simple measurement software, so that the response of each loudspeaker can be measured at the listening position. This response can then be analysed and corrected by adjusting the monitor placement and/or using the monitor’s own onboard EQ filters.
A common issue in rooms is in the LF region, where placing the monitor close to a rear wall will minimise the rear-wall cancellation ‘dip’ mentioned previously, but will artificially boost the LF response in general. When monitoring with this excessive bass level, it’s then easy to dial back the LF and thus end up with a bass-light mix when played back on other systems (figs 3 and 4). So careful adjustment of the monitor’s onboard EQ will help neutralise this effect and help you mix with more confidence.
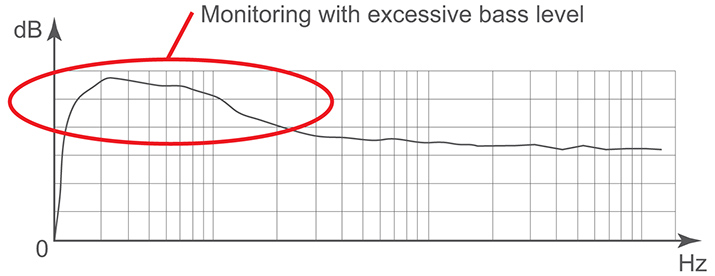
Fig 3
Monitors will benefit further from an even more comprehensive type of room correction – via calibration software – which allows very detailed calibration of the monitoring system to the room, with the ability to further fine tune the performance to the user’s own individual preference.
Certainly as immersive audio formats become more widely used, this ability to optimise a large number of monitors and subwoofers to the room becomes much more of a challenge without the use of this type of powerful software. In some cases this software will go far beyond basic calibration and provide a host of tools for adjusting monitor levels, switching listening positions and controlling bass management.
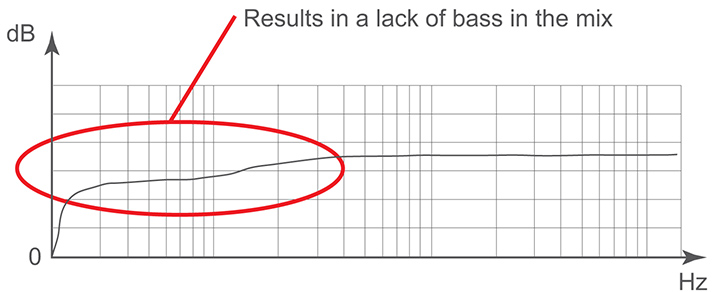
Fig 4
There’s no doubt that with careful attention to monitor selection, placement and calibration, you’ll achieve a far more truthful, reliable monitoring system. We’d strongly encourage anyone involved in broadcast audio to invest some time in understanding the basics of this subject and ensuring that your monitors are really telling you the truth!
For more information and useful tips on this subject, you can view and download Genelec’s simple Monitor Setup Guide here.